Facebook Pinterest Bloglovin Instagram Teachers Pay Teachers Image Map
Showing posts with label classroom management. Show all posts

Monday, September 12, 2016

1st Grade Classroom Reveal!

I am SO EXCITED to show you all my classroom space!

As you may know, I have made the transition from upper elementary (4th, 6th, and 3rd) to FIRST GRADE and I am SO pumped!

A few notes as you tour my classroom--- We are using flexible seating, which means no individual desks and LOTS of options for seating.  Some of the furniture was provided through a grant my team wrote.  Other furniture was bought by me, on a budget!  Our first grade team is also piloting Personalized Learning, where students take ownership of their learning and use technology to reach their goals.  Ready?  Here we go!!


Your first glimpse into my room is this window- complete with a picture of little Miss Woodward.  :)


Look to the right and you will see our lounge area.  Table and white chairs from IKEA, and couch through the grant.  Word wall is located behind the couch.


Our moon stools (all lightweight and move-able!) are from the grant.  The TV is from the principal to promote technology use in Personalized Learning.  It's attached to an Apple TV.  Lots of options for technology integration!  The lovely crate stools made by *yours truly* for the guided reading/guided math table.


Our classroom uses community supplies.  Each table has a bucket of sharpened pencils and erasers for work time.  Students have the option of using any material for projects at any time. They just need to grab a bucket and return it when finished.  :)


I do not have a teacher desk in my classroom.  I usually use the kidney table as a work space, and the grey and black stand the lamp is on to store desk stuff.  Those lovely clear drawers were a birthday gift from my parents (!) and are used as mailboxes for my kiddos.


Another view of the guided reading table and manipulative bins.


I am still in love with my SitSpots!!  Another IKEA table and a few stools make a cozy little work space.  You can also see my floor table (took the legs off!) and IKEA cushions (in the green bin) for kids to sit or kneel on the floor.


You guys, I'm so in love with this classroom!  
I can't wait to see all of the learning take place in this space!


Wednesday, September 25, 2013

Tried it Tuesday- Choosing Buddies for Reading

Hello everyone!  Today I am linking up with Fourth Grade Flipper for Tried it Tuesday!


Since I introduced Buddy Reading, Ms. Meredith and I have been choosing buddies for the students.  We decided to do it that way so we are setting them up for success with Buddy Reading.  Well, yesterday, we decided to let them try choosing their own.  However, it did require some set-up.

First, we talked about how disruptive it would be if we all got up at once and said, "I NEED A BUDDY!"  So we talked about a more calm way to signal that we needed a buddy.  As if it were rehearsed, one little guy said, "Well, we could raise our hands to signal..."  I said, "YES!  That's a great idea!"  So I wrote it on our chart.

How to Choose a Buddy
- Raise your hand to signal that you need a buddy


Then, I showed them how to make eye contact with someone in the circle.  They can only choose a buddy that they made eye contact with.  I added that to our chart.

How to Choose a Buddy
-Raise your hand to signal that you need a buddy
-Make eye contact
-Move across the circle and ask, "Do you want to be my buddy?"

We decided that we always answer, "Yes!", unless you already have a buddy.  Then you say, "No, thank you.  I already have a buddy."

It was also important for them to understand that their buddy might not always be their closest friend.  On our chart, we decided that a buddy should be someone we can be successful readers with.


So, after we discussed and modeled, we tried it!  

1) We signaled that we needed a buddy.
2) We made eye contact with someone and asked, "Will you be my buddy?"
3) We chose a way we would buddy read (Read 2 books, Check for Understanding, or I read, You read).
4) We chose a successful, comfortable spot.
5) We started right away, and read the whole time.


They actually did pretty well for choosing their buddy for the first time!  We Buddy Read for about five  minutes, and then I brought them back to check-in.  I asked them:

-Who felt like they chose a successful buddy?
-Who felt like they couldn't read successfully with their buddy, and are going to try a new buddy this time?
-Did someone choose a successful spot?  Where was it?
-Did someone choose a spot where they were not successful?  Where can you try next time?

We practiced three times, each time choosing a new partner.  


Choosing a buddy- Tried it... Success!


What did you try this week?

Until next time,
-Miss Woodward

Sunday, September 22, 2013

Daily 5 Anchor Charts

I have been using the Daily 5 this year, and so far I am loving it!  My students are loving it, too!  Some of them have even told me that they actually like reading!  :)

If you are unfamiliar with the Daily 5, it is a system that helps manage your literacy block.  Students spend the first month building habits for working independently on reading and writing.  That way, when you are conferencing with students and working with small groups, the other students know exactly what is expected of them, and they can work independently without interrupting your group time.

Setting up the Daily 5 takes about a month.  We are about halfway through the setup, and have introduced Read to Self, Work on Writing, and Buddy Reading (Read to Someone).  We still need to introduce Word Work and Listen to Reading.

As we introduce each new component of the Daily 5, we make a chart as a class, to help us remember behaviors for each component.  The charts tell what the students' job is to do, and what my job as a teacher is to do.

Here are some of my anchor charts.  If you have any questions about them, please ask!  This is my first year doing Daily 5, but I can share my experiences and how I've made it work for my group of kids!


Here are the behavior expectations for Read to Self.  We discuss these expectations before we practice, and also afterwards, to see if we met the expectations or if we can try harder next time.


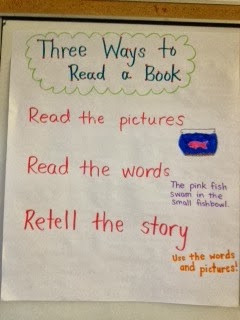
We also talked about ways we can read a book.  We can read the pictures, read the words, or retell the story using the words and pictures.


I really want my kids to focus on choosing "Good Fit Books" this year.  For example, last week in the library, one of my students insisted on checking out Twilight, because she had seen the movie.  I understand the connection, but that is definitely not a good fit book for a 3rd grader.  To choose a "Good Fit Book", we use "I Pick"

I- I choose a book
P- Purpose (Why do I want to read it?)
I- Interest (Does it interest me?)
C- Comprehend (Do I understand what I read?)
K- Know (I know most of the words.)


These are some of the strategy cards the kids can refer to while they read.  At the beginning of the year, I used a read-aloud to model each strategy.  After practicing Read to Self, I check in with students to see if anyone used a strategy while they read.


After we had a good start with Read to Self, we started Work on Writing.  I gave each student a notebook, and during Work on Writing, their job is to write about whatever they want.  We brainstormed a list of topics, and I sent them on their way.  Now, each day when we check-in, I give them the option of continuing what they started yesterday, or starting something new.


Now on to their favorite (and the most challenging to build stamina for)- Buddy Reading!
For Buddy Reading, students have to sit EEKK (Elbow to Elbow, Knee to Knee).  There are three ways to Buddy Read:


Read 2 Different Books
Check for Understanding
I Read, You Read

(I can go into more detail with these in a later post.  I introduced each one individually, and gave the students a day to practice each one.  On the fourth day, I gave them a choice of which way they'd like to read with their buddy.  It didn't go so well... so we started from the beginning and practiced each one individually before I let them try choosing again.)


My front whiteboard is where I keep all of my anchor charts.  Once we start using Daily 5 independently, I will move these charts to free up my whiteboard space.  But for now, this is like Daily 5 Headquarters.


I am hoping to put together a "Daily 5 Starter Kit" to help teachers who are new to the Daily 5 get started with all of the setup.  Would anyone else find that helpful?  If you have any questions about my anchor charts, please let me know!

Until next time,
-Miss Woodward

Tuesday, September 17, 2013

Tried it Tuesday- Dry-Erase Crayons and Take a Break!

Hello everyone!  Today I'm linking up with Fourth Grade Flipper for their Linky, "Tried it Tuesday"!


Today, I tried two things-  My new dry-erase crayons (read about those here), and a new "Take a Break" area.


1.  The other day, I picked up these dry-erase crayons at Target.  They were on clearance, so I decided to try them out!


The pack came with eight crayons, a built-in sharpener in the box, and a cloth for erasing.


I used them to write my morning message today.  It was super different than using dry-erase markers, but not bad.  It just takes some getting used to.


The kids could still read it just fine, and they thought it was sooooo cool that I used crayons on the whiteboard!


So.... Dry-Erase Crayons: Tried them, Liked them!


2.  I tried implementing a Take a Break spot today.  If you haven't heard of Take a Break, it is a positive way for students to calm down before returning to the group.  It is part of the Responsive Classroom style of teaching.  Yes, I probably should have done this from the beginning of the year, but I wasn't exactly sure what I wanted it to look like.  I have seen many classrooms use Take a Break as just a chair for students to calm down, and I have seen classrooms where students have to record what they did to need to Take a Break.


Here is my Take a Break area in the back of the room.  I used an extra desk and chair.  I hung up a Take a Break sign, and ways students can Take a Break.  I also set up some pencils, and a little stack of recording sheets.

When I ask them to Take a Break (for any type of inappropriate behavior), they simply go to the area, choose a way they want to take a break (count to ten, take deep breaths, etc.).


Here is the recording sheet that students need to fill out before returning to the group.  It says, "What happened?", "What can you do differently next time?", and "Are you ready to return to the group? (calm, focused, quiet voice, listening ears, ready to learn)".


This Take a Break Kit will be available in my TpT store soon!!

So.... TRIED Take a Break, but (luckily) nobody had to use it today!  I will let you know how it goes once somebody has to visit the area.


What did you try today?  How did it go?

Until next time,
-Miss Woodward

LinkWithin

Related Posts Plugin for WordPress, Blogger...